Nearly Free Blog - Jekyl Azure DevOps Cloudflare
Dec 27, 2018
9 mins read
Super cheap Jekyll static site with free custom domain, SSL and CDN and built via a CI/CD pipeline.
So many initialisms
Who’s this for?
Anyone who wants a nice cheap site that’s fast, responsive, easy to run and doesn’t mind a bit of intellectual fortitude to get it up and running
Here’s the flow
- You have Jekyll site code in a Github or Azure Repo.
- You git push when you make changes (e.g. You create a new post)
- Azure DevOps Build pipeline runs Jekyll build on a hosted ubuntu agent and creates the site in a folder
- Azure DevOps Release pipeline takes that Site and copies it to the Azure Blog Storage $web folder.
- Boom, it’s all updated and available at your https://yoursite.com
Assumptions
- You know some IT stuff and terms or can figure them out.
- You can use git at a basic level
- You can read and follow instructions.
Why?
Previously I had a Jekyll generated blog running in a very small shared WebApp on Azure. However Azure recently caught up with AWS from like 5+ years ago and have started offering static site hosting in Azure Blob Storage.
This means it will end up costing like 10p or less a month. Probably closer to 2-3p
I recommend you use Hot storage just in case your blog ever gets a bazillion hits for some reason, the amount of data you’re carrying it doesn’t matter about data costs.
Blob Static Sites don’t come with the ability to use HTTPS and custom domain names. There’s instructions for using Azure CDN but I went with Cloudflare as it’s totally free and lets me do url redirects from www. (e.g. https://www.cloudconfusion.co.uk » https://cloudconfusion.co.uk )
Requirements:
- A static site (I use Jekyll but you can use Hugo or type all the html yourself. I don’t care, am only providing CI/CD instructions for Jekyll though.)
- A Domain Name (I bought mine from Namecheap )
- Azure account
- Azure Devops account (create a Project)
- Cloudflare Account (instructions here for adding your Domain Name to it)
1 - Create a Resource Group and a Storage Account in Azure
You can do this in the portal via GUI but here’s a wee scripto for ya too.
The script creates a resource group, Azure Storage account and enables it for static sites.
Easiest way is just to paste it into the Cloud Shell You’ll notice 2 lines are commented out. This might not be needed if you only have one subscription but I’ve thrown it in there in case you have more than one.
This is because the commands succeeding those, execute in the context of a subscription. If you’re in the wrong one, you make it in the wrong place
The name of the storage account must be unique and lowercase! ..so if the script fails it’s because of that. I should probably stick a random number at the end of it
$name = "jekyllstatictest"
$location = "westeurope"
\# $subscriptionid = "?????"
\# Set-AzureRmContext -SubscriptionId $subscriptionid
$RG = New-AzResourceGroup -Name $name -Location $location
$SA = New-AzStorageAccount -Name $name -Location $location -ResourceGroupName $name -AccessTier "Hot" -SkuName "Standard_LRS" -Kind "StorageV2"
$SA | Enable-AzStorageStaticWebsite -IndexDocument "index.html" -ErrorDocument404Path "404.html"
Enabling it for Static sites creates a container in the Storage Account called $web. That’s where you put your site html, css etc.
2. Create Service Principal, make Owner of Resource Group
This is mostly copy and pasted from my Nuget server post. Been updated though
You’ll notice the repeated variable from the last script. Again, these could easily be a one shot script but It’s easier to explain if I break it down.
So what we’re doing here is creating an App in Azure Ad to use as a Service Principal (rather than using our own password and a real account later ).
There is an easy automated way to do this in the Azure Devops GUI but the automated way make the SP a Contributor to the whole Azure Subscription, which it doesn’t need. So, better security is to be explicit in what this can do.
The script does all the needed, all you need to do is NOTE DOWN THE SECRET but if you want to understand what it’s doing, this is how you do it all in the portal.
You’ll notice the url linked in the script comment. It’s where I got some of the script from so tried to attribute as appropriate. Weirdly you can’t just use anything as the SP password and have Azure Devops accept it. It really wants a 44 character effort.
$name = "jekyllstatictest"
$location = "westeurope"

$app = New-AzureRmADApplication -DisplayName $name -IdentifierUris "https://$name.com"


$sp = New-AzureRmADServicePrincipal -ApplicationId $app.ApplicationId

Start-Sleep 20


New-AzureRmRoleAssignment -RoleDefinitionName Owner -ServicePrincipalName $sp.ApplicationId -ResourceGroupName $name

#https://www.sabin.io/blog/adding-an-azure-active-directory-application-and-key-using-powershell/

function Create-AesManagedObject($key, $IV) {

    $aesManaged = New-Object "System.Security.Cryptography.AesManaged"
    $aesManaged.Mode = [System.Security.Cryptography.CipherMode]::CBC
    $aesManaged.Padding = [System.Security.Cryptography.PaddingMode]::Zeros
    $aesManaged.BlockSize = 128
    $aesManaged.KeySize = 256

    if ($IV) {
        if ($IV.getType().Name -eq "String") {
            $aesManaged.IV = [System.Convert]::FromBase64String($IV)
        }
        else {
            $aesManaged.IV = $IV
        }
    }

    if ($key) {
        if ($key.getType().Name -eq "String") {
            $aesManaged.Key = [System.Convert]::FromBase64String($key)
        }
        else {
            $aesManaged.Key = $key
        }
    }

    $aesManaged
}


function Create-AesKey() {
    $aesManaged = Create-AesManagedObject
    $aesManaged.GenerateKey()
    [System.Convert]::ToBase64String($aesManaged.Key)
}

#Create the 44-character key value

$keyValue = Create-AesKey


$appsecret = New-AzureRmADAppCredential -ApplicationId $sp.ApplicationId -Password (ConvertTo-SecureString ($keyValue) -AsPlainText -Force) -EndDate (Get-Date).AddMonths(12)

"********
copy this down , you need it later  it's the app secret key   >>    " + $keyValue

"This is the application / service principal ID . copy this too >>  " +  $app.ApplicationId
Boom - you now have a place to put your Nuget Server code and a Service Principal that has complete control of the Resource Group it’s in, and nothing else.
Once more - KEEP AHOLD OF THE $keyvalue. You cannot get it later!.
If you do botch it, just rerun that part of the script or use the portal again.
3 - Create Service Endpoint for the Resource Group, using the Service Principal
Time for more pictures than you’re used to in this blogpost so far. This is copied from my Nuget Server post but it’s basically the same
Get the to the Azure Devops Project you created, go to Project Settings > Service Connections (Under Pipelines)

Then it’s a new Service Connection, for Azure Resource Manager.

I DON’T HAVE A PIC BUT CLICK THE BLUE BIT AT THE BOTTOM THAT SAYS TO USE THE ADVANCED CREATION
Now you’ll see where the script popped out those useful pieces of info you’re reusing now.
Click verify and you should green tick and go.

4 - Make your build
The build is defined in YAML, put the below into a file called “azure-pipelines.yml” in the root of your Repo. This will do everything needed to build a Jekyll site and create the artifact needed to deploy the build.
I got most of the below from https://www.damianflynn.com/ . Great Site, go check him out.
resources:
- repo: self

trigger:
- master

queue:
name: Hosted Ubuntu 1604

steps:

- task: UseRubyVersion@0
displayName: 'Use Ruby >= 2.4'


- script: 'gem install bundler'
displayName: 'Install bundler'

- script: 'bundle install'
displayName: 'Install Jekyll and Dependencies'

- script: 'bundle exec jekyll build -d $(Build.ArtifactStagingDirectory)'
displayName: 'Build Jekyll Static Site'

- task: PublishBuildArtifacts@1
displayName: 'Publish Artifact: _site'
inputs:
	ArtifactName: '_site'
5 - Make your Release Pipeline
(I’d run the build once before you do this, makes it easier also my Nuget server post has even more detail if you’re needing it)
I’m assuming you can figure out what to do from these pictures (no YAML sorry) but basically :
- Create a new Release Pipeline
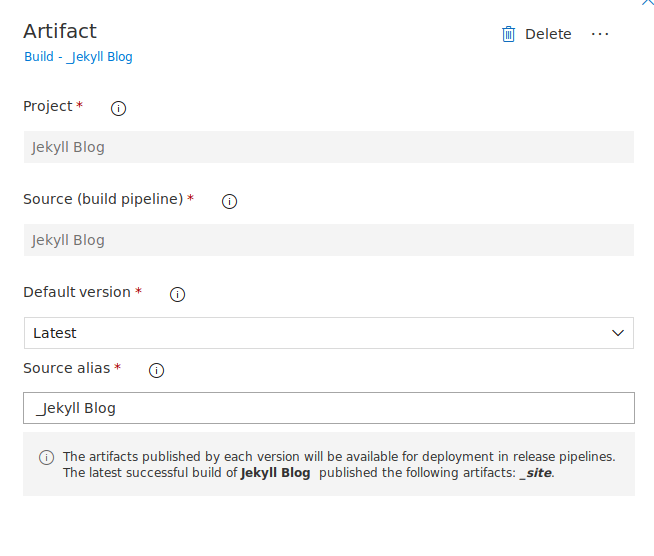
- Add the _Site Artifact created in build
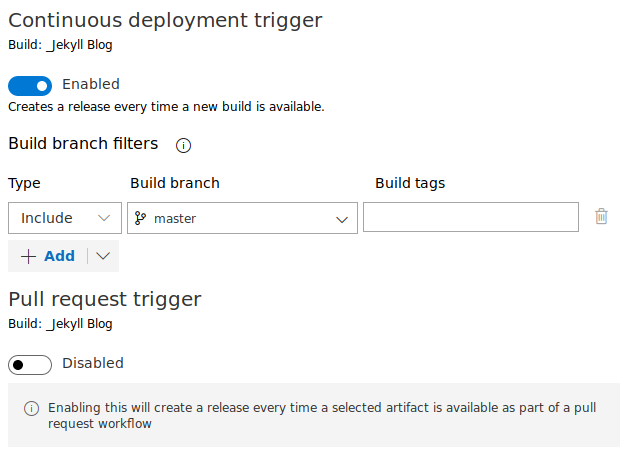
- Do continuous deployment for wheneber anything is pushed to Master Branch.
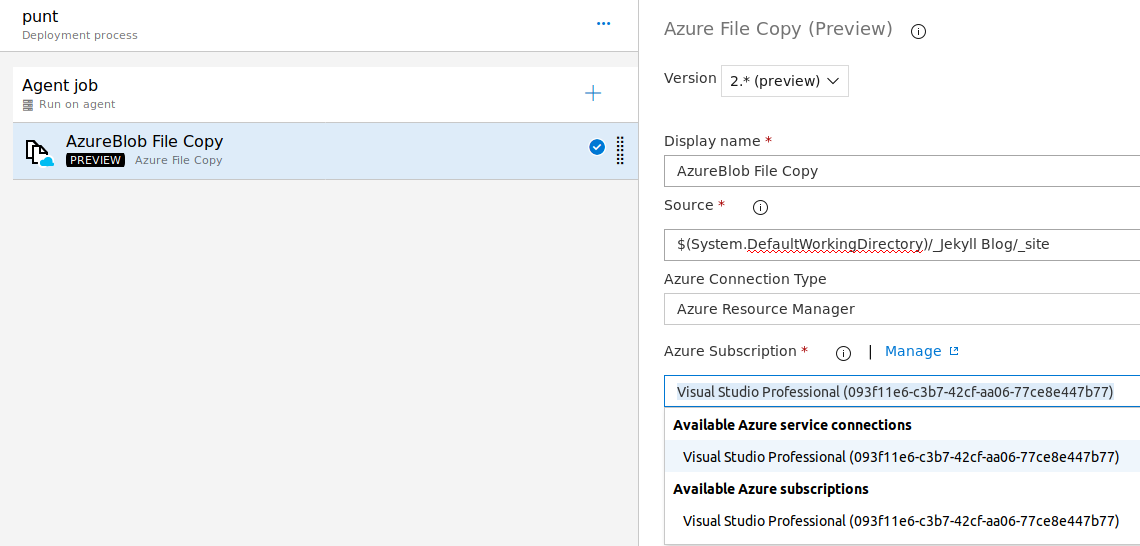
- Azure File Copy to the blob storage, the files from _site to the $Web folder using the Service Connection you made.
Add the Build Artifact to the Release pipeline stagng area.
Continuous Deployment Trigger
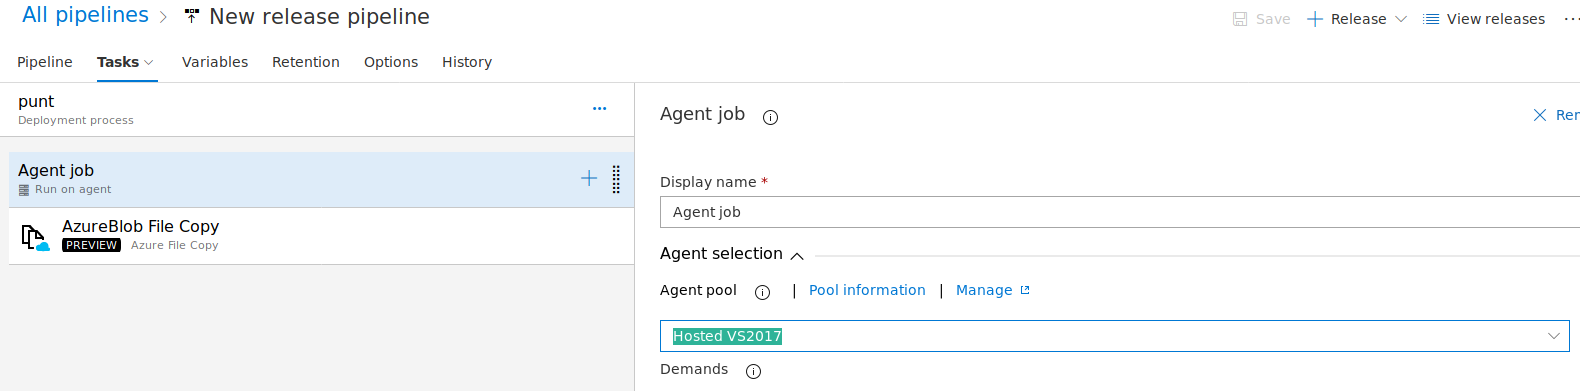
Agent Pool of Hosted
Blob Copy Task 
Use the Service Connection we made already
That should be basically it. Make sure your source and destination are correct.
Now when you commit and push to master it should build the site and also deploy it.
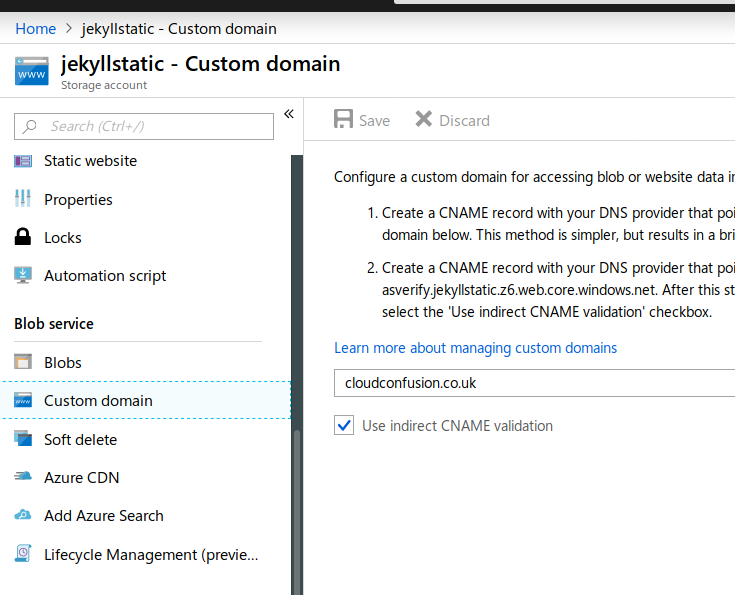
6 - Adding a custom domain
This part might take AAAAGES of waiting, especially if you mistype a setting. So be careful and WAIT. You need to go to the Azure portal and then the Storage Account you created. DNS changes take hours sometimes to register. Up to 48. Check all your settings carefully and then WAIT.
Just follow the instructions on the actual screen in the Azure Portal
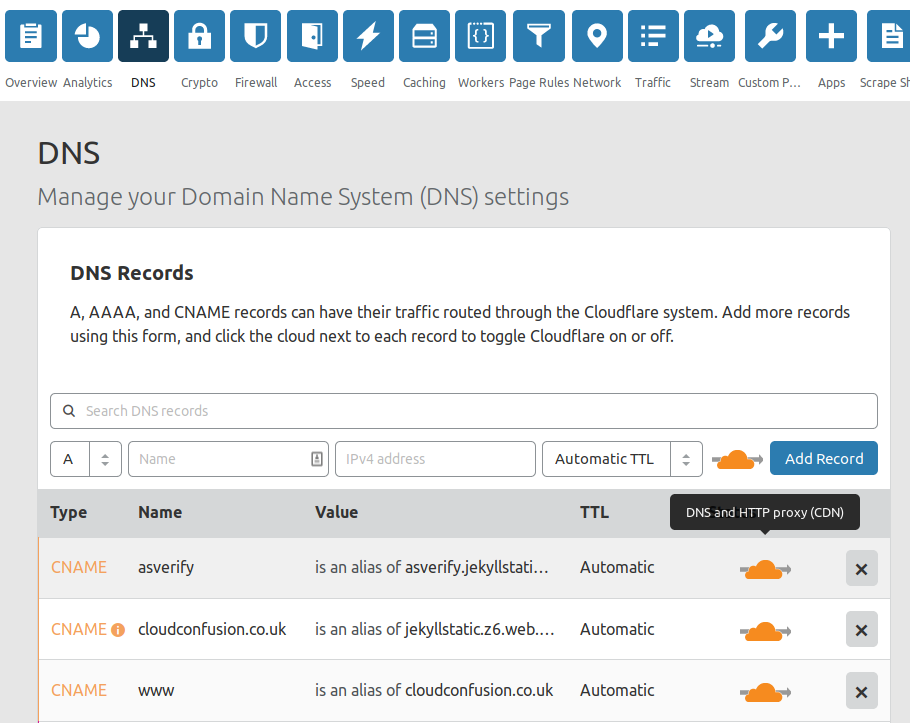
Your DNS at Cloudflare needs to be set like the picture below. Once it’s done, it may take a few hours before Azure lets you save and it authenticates.
TO GET AZURE TO RECOGNISE AND AUTHENTICATE YOU NEED TO CHANGE THE ORANGE CLOUD TO GREY - DNS ONLY BY CLICKING ON IT
Once the Custom Domain is saved, change the cloud back to Orange for full SSL. Again, it might take hours before it all starts working when you go to your site.
Redirect www.yoursite.com to yoursite.com using Page Rules. If you don’t do this, you’ll get not found when people try to type in www.yoursite.com instead because static site only allows one domain name.

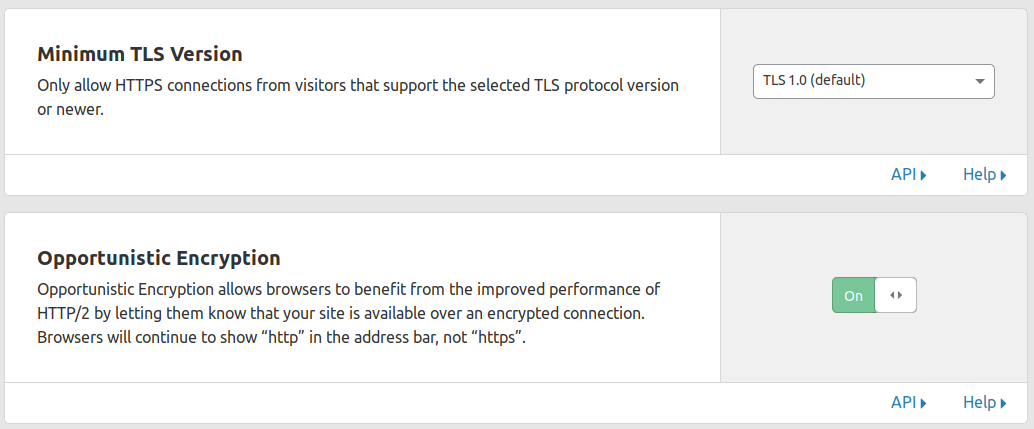
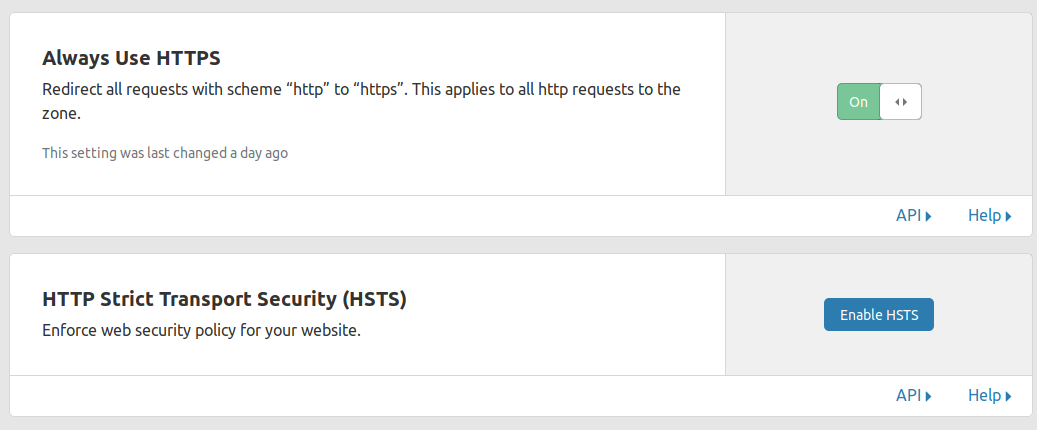
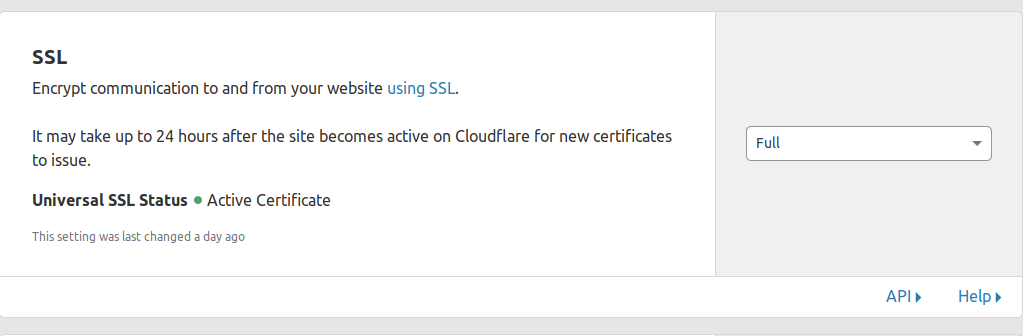
Under the Crypto menu in CloudFlare , have all this stuff set.
That should be it. All done.
The blog you’re reading this on is setup that way so it seems to work.
Unnecessary buttons