Powershell Repository in Azure With CI CD Pt1
Oct 19, 2018
14 mins read
A Free Powershell Repository with CI CD in 9 steps!
…and I do most of the work for you
That sounds like an emmy award winning blog right there !
My main reason for writing this blog, much like a lot of people’s is:
I really want Microsoft to give me an MVP
Love.
Okay it’s REALLY it was way more hassle than I expected for some bits of it so thought I’d write it down in case I forget about it. Plus it’s a chance to automate some stuff.
Why would I even want my own repository?
Valid question. Maybe you’re not even using source control. BOOOOO to you if so. Here’s why I want mine:
- It lets me have two versions of the same module alive. I could be running a version 1.0.0 for prod and also have a 1.1.1 version for beta. I can install-module -requiredversion and pick which one I want.
- The above means it’s easier to share the work load with people if they’re a bit nervous about getting started in powershell. They’re just creating a new version down the same pipeline. They’re not overwriting everything that came before.
- It makes it easier to share modules with other people. They just register the repo and then install-module from it. A standard Powershell pattern.
What you get in this post
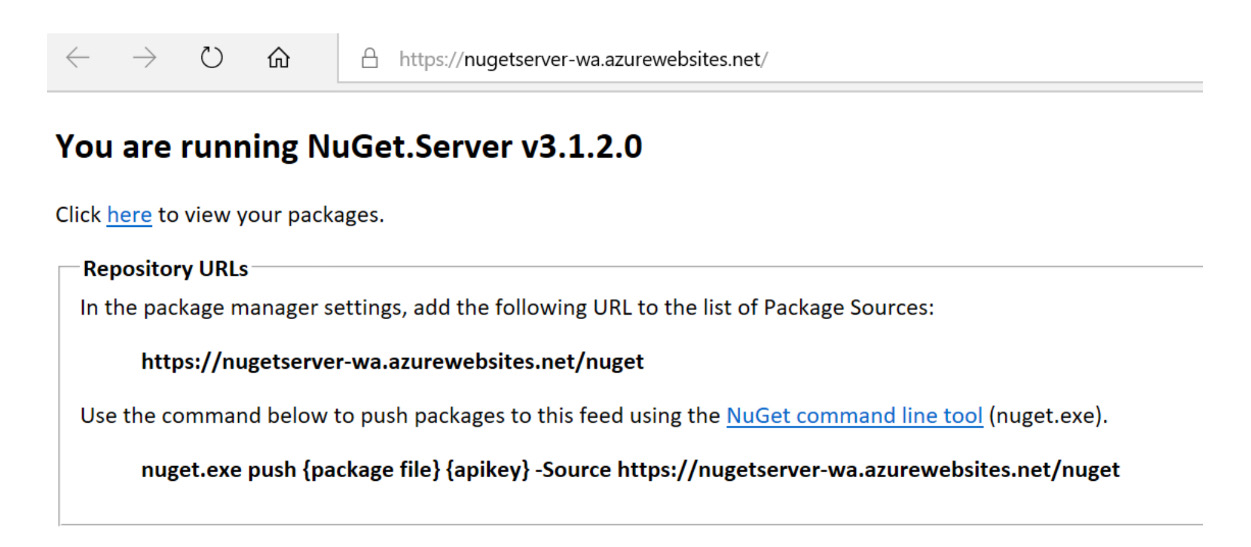
- Instructions and scripts on how to setup a free Nuget server in an Azure WebApp with a CICD pipeline in Azure Devops (formally VSTS)
What you don’t get in this post (links tho!)
- Why you want a repo
- How to setup an Azure account
- How to setup an Azure Devops account
- Visual Studio Community 2017 downloaded for you
- How to add your new repo to your powershell sessions(that’s in Part 2)
- How to push packages to your Server (that’s in Part 2)
Requirements:
- Azure subscription (Free)
- Azure Devops (Free)
- Visual Studio 2017 (Free)
- A weak lemon drink. (small but worthwhile cost)
Why so many parts?
Part 1 is enough to get a Nuget Server up in Azure deployed through Azure Devops Part 2 is making it a bit better with a bit of variable substitution and also using Azure Devops to package and publish modules to your new build server. Part 3 doesn’t exist yet but it’ll probably be pretty unnecessary for most people.
On with the show
Depending on how familiar you are with Visual Studio , Azure and Azure Devops, it might take 20 mins to an hour+ for the whole shebang. If I didn’t love reading myself so much it could probably get to 5 minutes, woe is me for I am a showman. However long it takes, you will get there. This part 1 in particular might not take you much time at all if you’ve got everything ready. Am splitting it into parts purely because if you’re not experienced with this sort of thing and don’t have the prereqs then this part takes waaaaaaay longer than if you do.
** This is not meant to be totally production ready. It’s a quick way to get going and try it out. It works. It will probably be fine for you but it doesn’t excuse lack of due diligence to check this fits your needs. Especially security wise. **
Big thanks to both Microsofts doc, 4sysops and Kevin Mar blog who gave me the leg up to get started.
I’m not going to go into why you might want your own repository rather than just stuffing your files into one big sock under your bed, this is just the technical part of getting it together.
High Level Step by Step:
Part 1
- Create Resource Group , Webapp Plan (F1), Webapp in Azure
- Create Service Principal, make Owner of Resource Group
- Create Repo in Azure Devops
- Create Service Endpoint for the Resource Group, using the Service Principal
- Clone Repo down in Visual Studio 2017
- Create Nuget Server in it
- Add an Api Key to Web.Config
- Create Build from Yaml
- Create Release pipeline > to Azure Webapp with CD
The steps are arranged above in the most optimal way, what’ll I’ll try to do at the end of each step is just give a sum up of what we did for maximum understanding. If this is all easy stuff for you, just be smug.
1. Create a Resource Group, Webapp Plan and Webapp in Azure
This part is all scripted and tbh you could combine parts 1 and 2. I’m keeping them separate purely for clarity reasons.
This and all there other pieces of code are in Source Control (as they should be!) and you can get to them here.
If you see improvements you can make or suggestions, please file Issues / Pull requests thanks.
The easiest way to run this script is to just paste it into the Cloud Shell, changing the variables as needed. However, if you have another way you like to throw code, go wild.
You’ll notice 2 lines are commented out. This might not be needed if you only have one subscription but I’ve thrown it in there in case you have more than one.
This is because the commands succeeding those, execute in the context of a subscription. If you’re in the wrong one, you make it in the wrong place
The name of the AzureRMWebApp must be unique! ..so if the script fails it’s because of that. I should probably stick a random number at the end of it
$name = "NugetServer"
$location = "westeurope"
\# $subscriptionid = "?????"
\# Set-AzureRmContext -SubscriptionId $subscriptionid
New-AzureRMResourceGroup -Name $name -Location $location
New-AzureRmAppServicePlan -ResourceGroupName $name -Name $name -Location $location -Tier "Free"
New-AzureRmWebApp -ResourceGroupName $name -Name "$name-WA" -Location $location -AppServicePlan $name
Boom, you now have a place to put your Nuget Server.
2. Create Service Principal, make Owner of Resource Group
There might be a better way to do this using Managed Instances but this’ll do for now. You’ll notice the repeated variable from the last script. Again, these could easily be a one shot script but It’s easier to explain if I break it down. At the end I might try to make one big beautiful script that just makes it all work. Vote in the comments! Kidding! I don’t allow comments. I just assume it’s all gravy.
This and all the other pieces of code are in Source Control (as they should be!) and you can get to them here.
So what we’re doing here is creating an App in Azure Ad to use as a Service Principal (rather than using our own password and a real account later ).
This means we don’t even need to know the password for it. We’ll never be logging in as it. We just random up a strong password and assign it permissions. This also needs a secret key setup that we can provide to Azure Devops to verify and authenticate.
There is an easy automated way to do this but the automated way make the SP a Contributor to the whole Azure Subscription, which it doesn’t need. So, better security is to be explicit in what this can do.
The script does all the needed, all you need to do is NOTE DOWN THE SECRET but if you want to understand what it’s doing, this is how you do it all in the portal.
You’ll notice the url linked in the script comment. It’s where I got some of the script from so tried to attribute as appropriate. Weirdly you can’t just use anything as the SP password and have Azure Devops accept it. It really wants a 44 character effort.
$name = "NugetServer"
$location = "westeurope"
$app = New-AzureRmADApplication -DisplayName $name -IdentifierUris "https://$name.com"
$password = [string](Get-Random -Minimum 1000000) + [string](Get-Random -Minimum 1000000)
$securePassword = ConvertTo-SecureString -Force -AsPlainText -String $password
$sp = New-AzureRmADServicePrincipal -ApplicationId $app.ApplicationId -Password $securePassword
Start-Sleep 20
New-AzureRmRoleAssignment -RoleDefinitionName Owner -ServicePrincipalName $sp.ApplicationId -ResourceGroupName $name
#https://www.sabin.io/blog/adding-an-azure-active-directory-application-and-key-using-powershell/
function Create-AesManagedObject($key, $IV) {
$aesManaged = New-Object "System.Security.Cryptography.AesManaged"
$aesManaged.Mode = [System.Security.Cryptography.CipherMode]::CBC
$aesManaged.Padding = [System.Security.Cryptography.PaddingMode]::Zeros
$aesManaged.BlockSize = 128
$aesManaged.KeySize = 256
if ($IV) {
if ($IV.getType().Name -eq "String") {
$aesManaged.IV = [System.Convert]::FromBase64String($IV)
}
else {
$aesManaged.IV = $IV
}
}
if ($key) {
if ($key.getType().Name -eq "String") {
$aesManaged.Key = [System.Convert]::FromBase64String($key)
}
else {
$aesManaged.Key = $key
}
}
$aesManaged
}
function Create-AesKey() {
$aesManaged = Create-AesManagedObject
$aesManaged.GenerateKey()
[System.Convert]::ToBase64String($aesManaged.Key)
}
#Create the 44-character key value
$keyValue = Create-AesKey
$appsecret = New-AzureRmADAppCredential -ApplicationId $sp.ApplicationId -Password (ConvertTo-SecureString ($keyValue) -AsPlainText -Force) -EndDate (Get-Date).AddMonths(12)
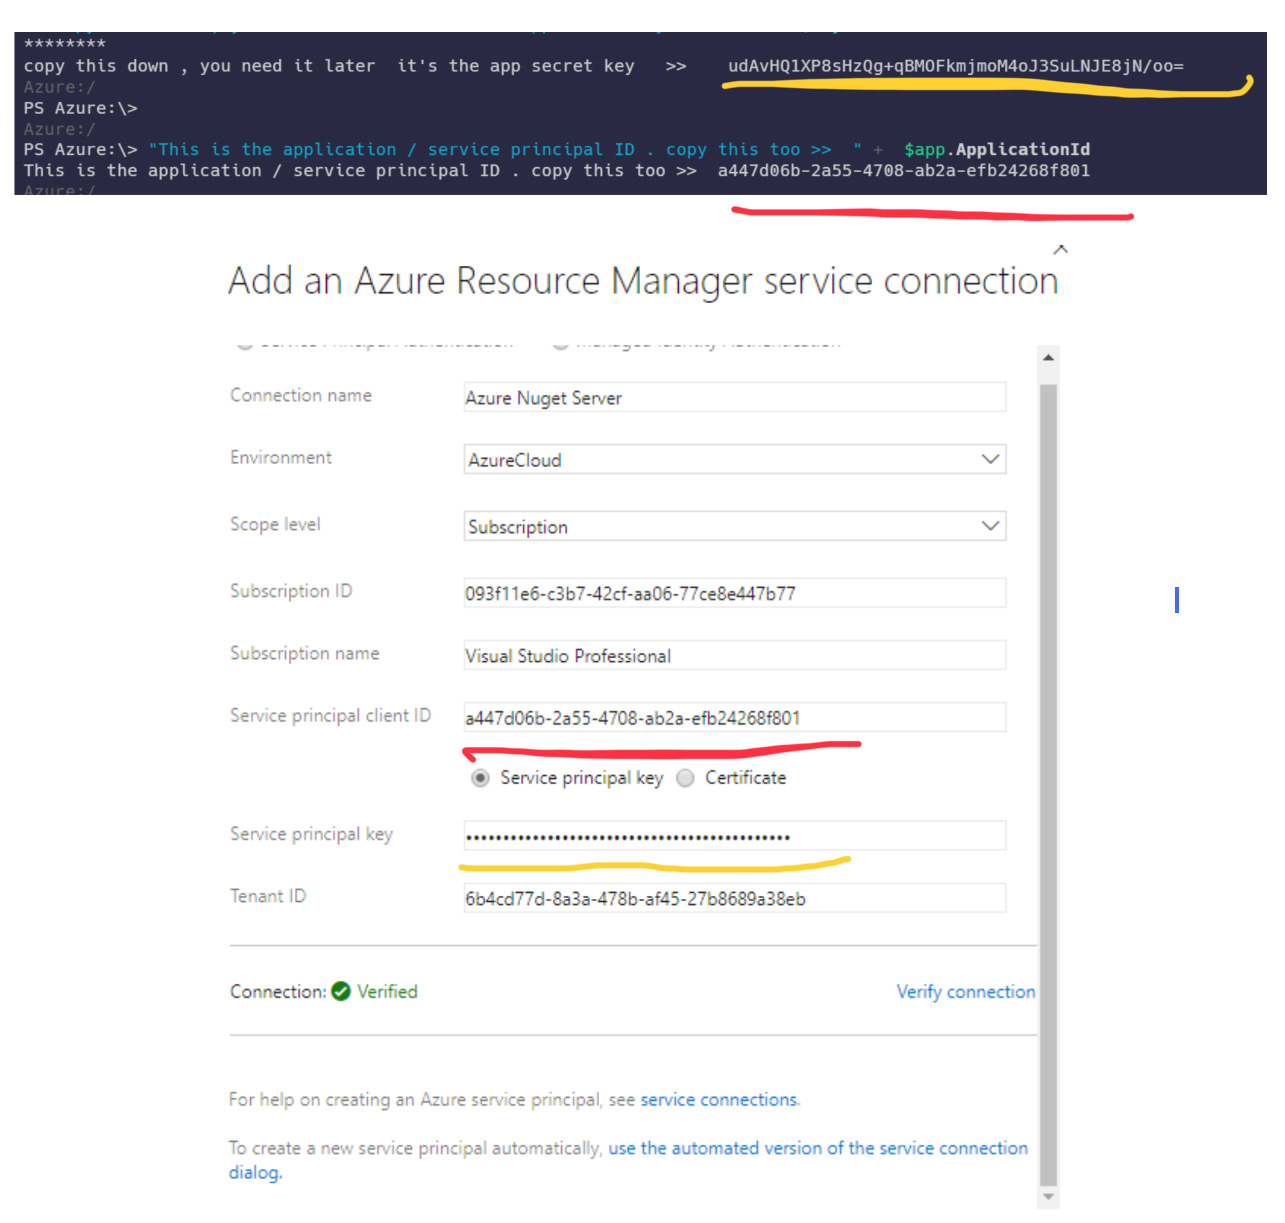
"********
copy this down , you need it later it's the app secret key >> " + $keyValue
"This is the application / service principal ID . copy this too >> " + $app.ApplicationId
Boom - you now have a place to put your Nuget Server code and a Service Principal that has complete control of the Resource Group it’s in, and nothing else. Once more - KEEP AHOLD OF THE $keyvalue You cannot get it later!. If you do botch it, just rerun that part of the script or use the portal again.
3. Create Repo in Azure Devops
This part isn’t automated. I know. I am a wretch. They call me Shane Lizard. I’m not going to repeat Microsoft’s Instructions for how to make a Git Repo so here you go
4. Create Service Endpoint for the Resource Group, using the Service Principal
Time for more pictures than you’re used to in this blogpost so far. Still in Azure Devops, go to Project Settings > Service Connections (Under Pipelines)
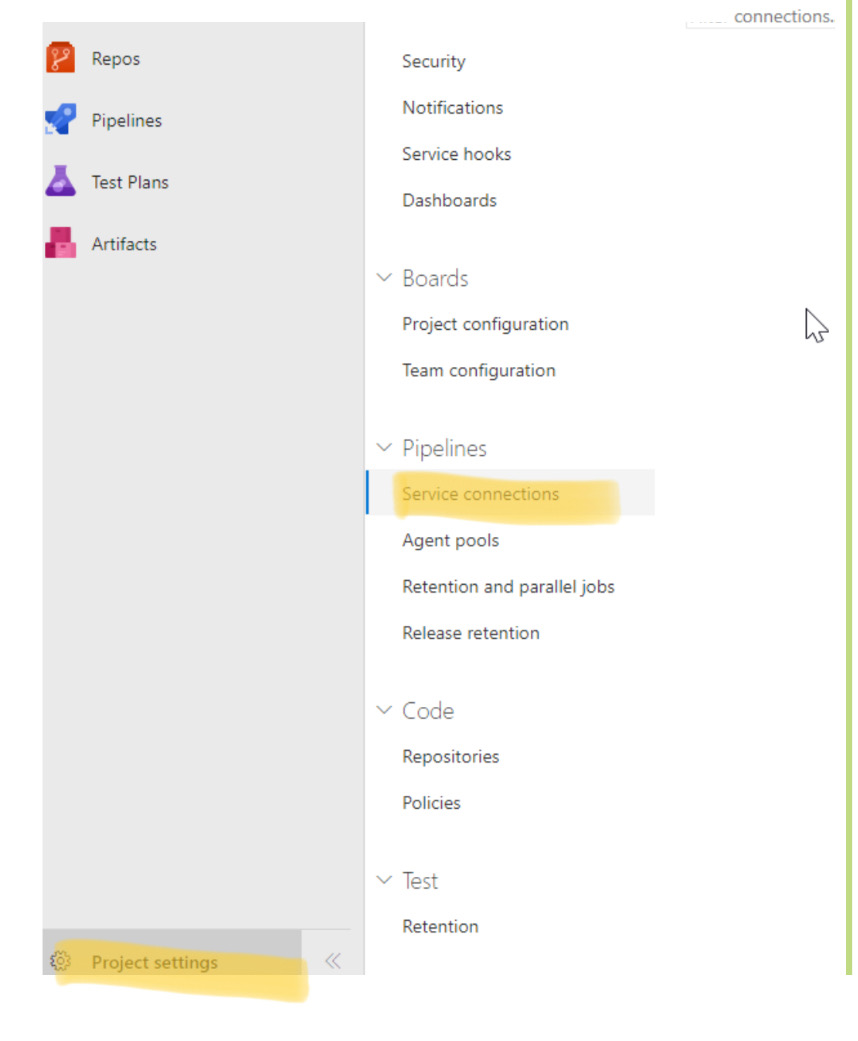
Then it’s a new Service Connection, for Azure Resource Manager.
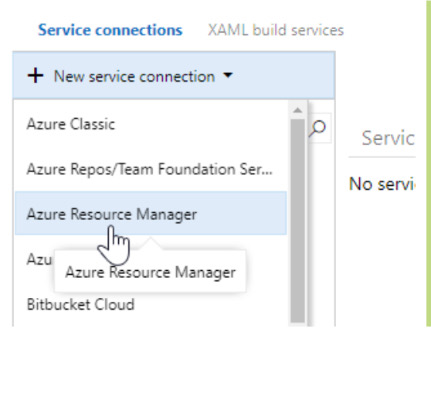
I DON’T HAVE A PIC BUT CLICK THE BLUE BIT AT THE BOTTOM THAT SAYS TO USE THE ADVANCED CREATION
Now you’ll see where the script popped out those useful pieces of info you’re reusing now.
Click verify and you should green tick and go.
5. Clone the repo down into Visual studio 2017
Microsoft already wrote this if you don’t know how to do it. I’m too lazy to do work twice
6. Create a Nuget Server in your cloned repo
Once again Microsoft has done this for me.. Couple of pieces to note. Stop when you hit the “Configuring the Packages” part. Don’t you fret about that!. Just stop it right there. Don’t do the API part either. I’m going to go into a bit more detail for step 7. Extra pay attention to the Microsoft note marked Important. They’re not messing around. The first time I did this, it didn’t have that and it took me quite the time before I got it working properly. Get under my wing.
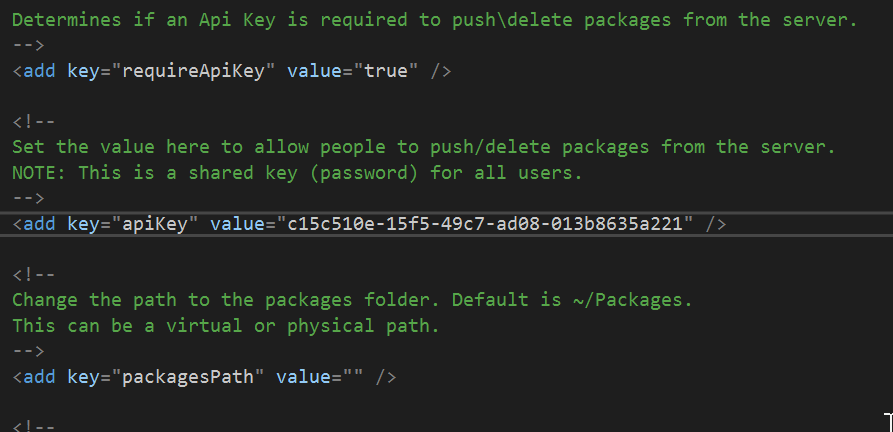
7. Add an Api Key to Web.Config, commit and push
Unless you want to directly shove stuff into the Packages folder and then reploy your entire Nuget site everytime then you’re going to want to have a way to push packages to it. You have 2 options.
- Have no API Key and just let anyone who knows the URL push whatever they want to your site.
- Make an API key up and use that to authenticate.
Since we’re not complete buffoons we’re going for number 2 of course. (I flunked my second year of Bufoon University. Poor juggling.. but that’s a tale for another time).
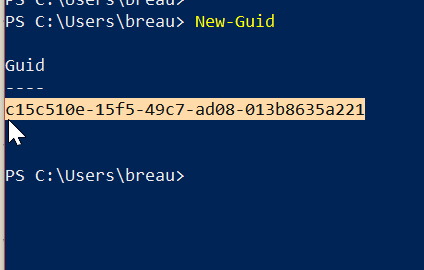
Here’s how you do it. Open up the Nuget Server project in Visual Studio 2017. Open up PowerShell. Type New-Guid , get the guid and run over the Vs2017 Paste it into the correct area of the web.config.
Screens show what your should see pretty much.
Now commit and push up to Azure Devops.
That’s us done in VS2017! Tick that off your bucket list.
8. Create your yaml build
This part is relatively new as I write this, yaml builds were only available after the rebrand to Azure Devops from Visual Studio Team Services. So this info is as fresh as my pop culture references. Yaml build means you can simply create a new file in your repo called Azure-Pipelines.yml and refer the build to it and boom. Everything is set. Yaml builds default to CI.
You’re still frightened though, coquettish, luckily here is one I created earlier !
It’s located here if you want to see it exactly as it should be used.
The below is it spelled out for you.
I’m not going to explain the words. Here are some resources if you want to dig in later.
queue:
  name: Hosted VS2017
  demands:
  - msbuild
  - visualstudio

variables:
  solution: '**/*.sln'
  buildPlatform: 'Any CPU'
  buildConfiguration: 'Release'

steps:
- task: NuGetToolInstaller@0

- task: NuGetCommand@2
  inputs:
    restoreSolution: '$(solution)'

- task: VSBuild@1
  inputs:
    solution: '$(solution)'
    msbuildArgs: '/p:DeployOnBuild=true /p:WebPublishMethod=Package /p:PackageAsSingleFile=true /p:SkipInvalidConfigurations=true /p:PackageLocation="$(build.artifactStagingDirectory)"'
    platform: '$(buildPlatform)'
    configuration: '$(buildConfiguration)'

- task: PublishSymbols@2
  displayName: 'Publish symbols path'
  inputs:
    SearchPattern: '**\bin\**\*.pdb'

    PublishSymbols: false

  continueOnError: true

- task: PublishBuildArtifacts@1
  displayName: 'Publish Artifact: drop'
  inputs:
    PathtoPublish: '$(build.artifactstagingdirectory)'
The official instructions are here but if you’re in the site it’s pretty self explanatory.
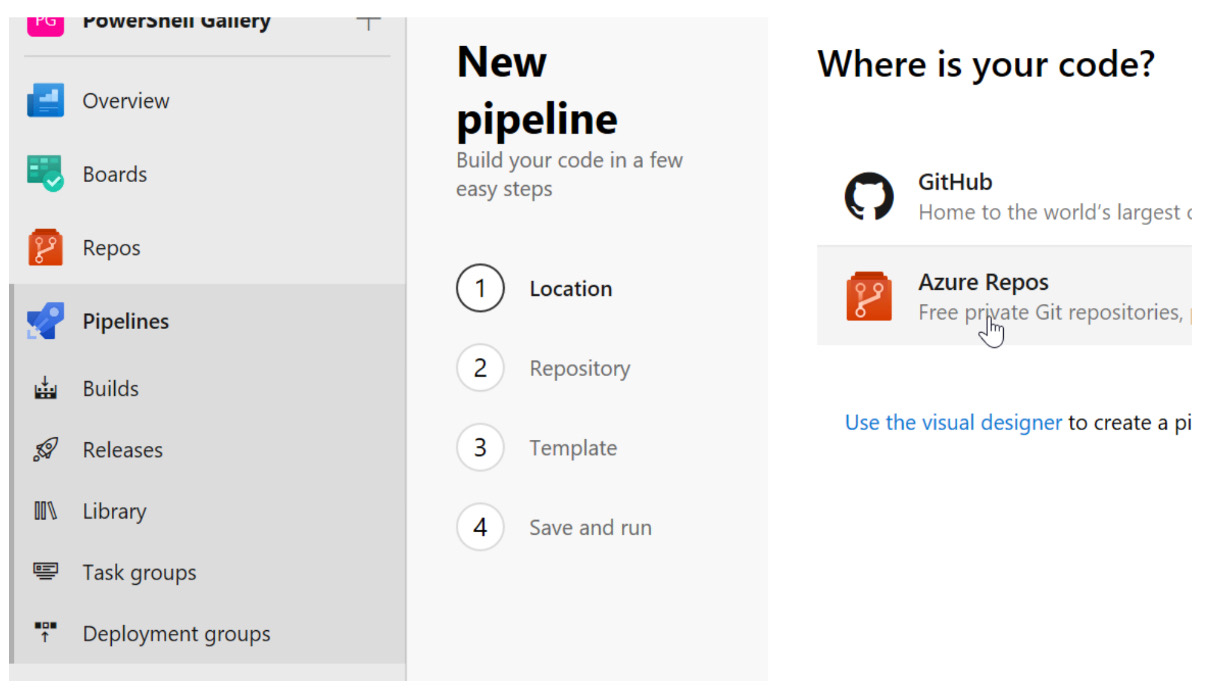
Go to Pipelines. Go to build. Click new. Point it at your Repo with the Nuget Server in it. If it finds the Yaml automatically then BOOM, easy game, if not then just hunt it down using the GUI.
See these here pictures I went and done you:
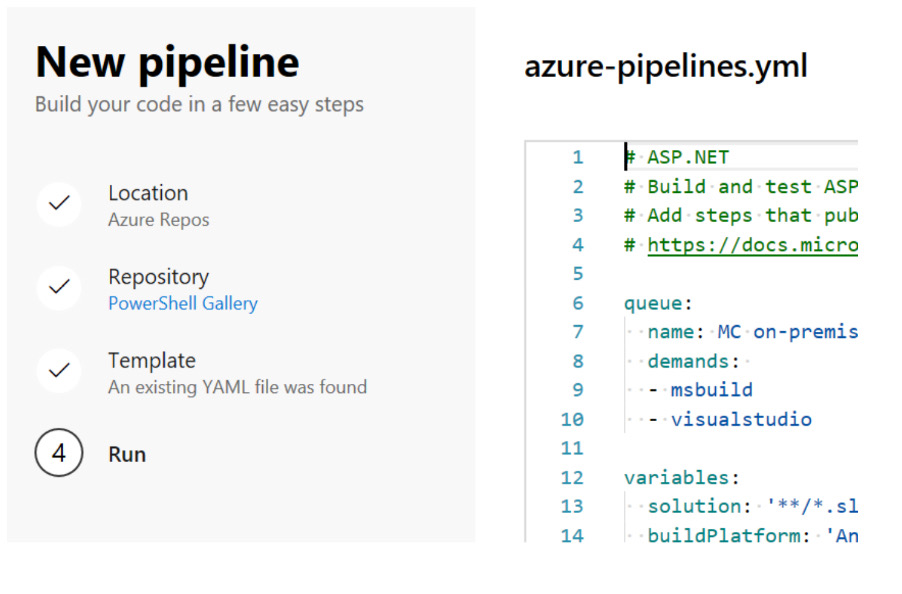
Then you want to queue your build and see it complete. It’s important you do this before the next step of setting up the release otherwise you’re going to be missing the ability to easily select the Drop. i.e. the zip file that the build produces.
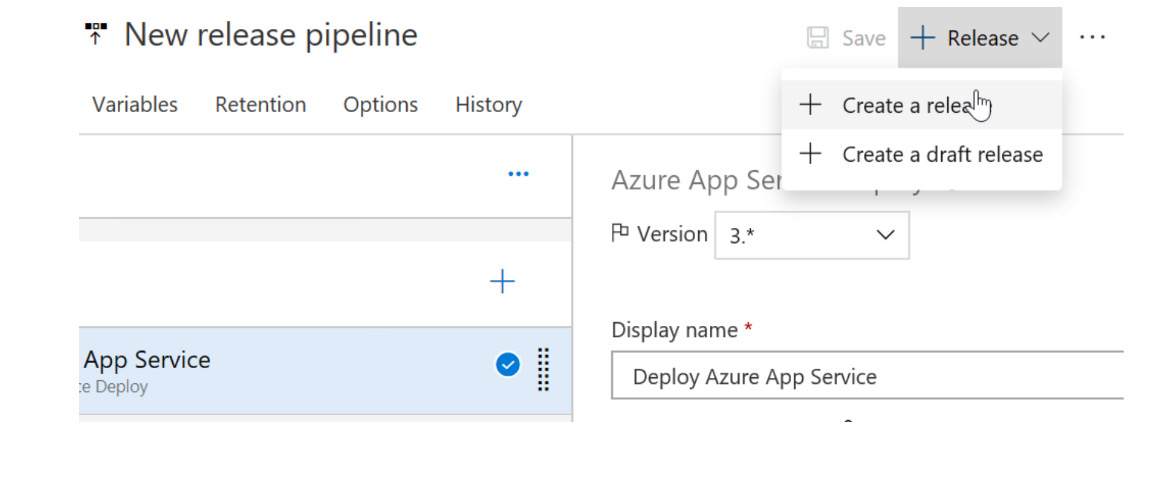
9. Create Release pipeline > to Azure Webapp with CD
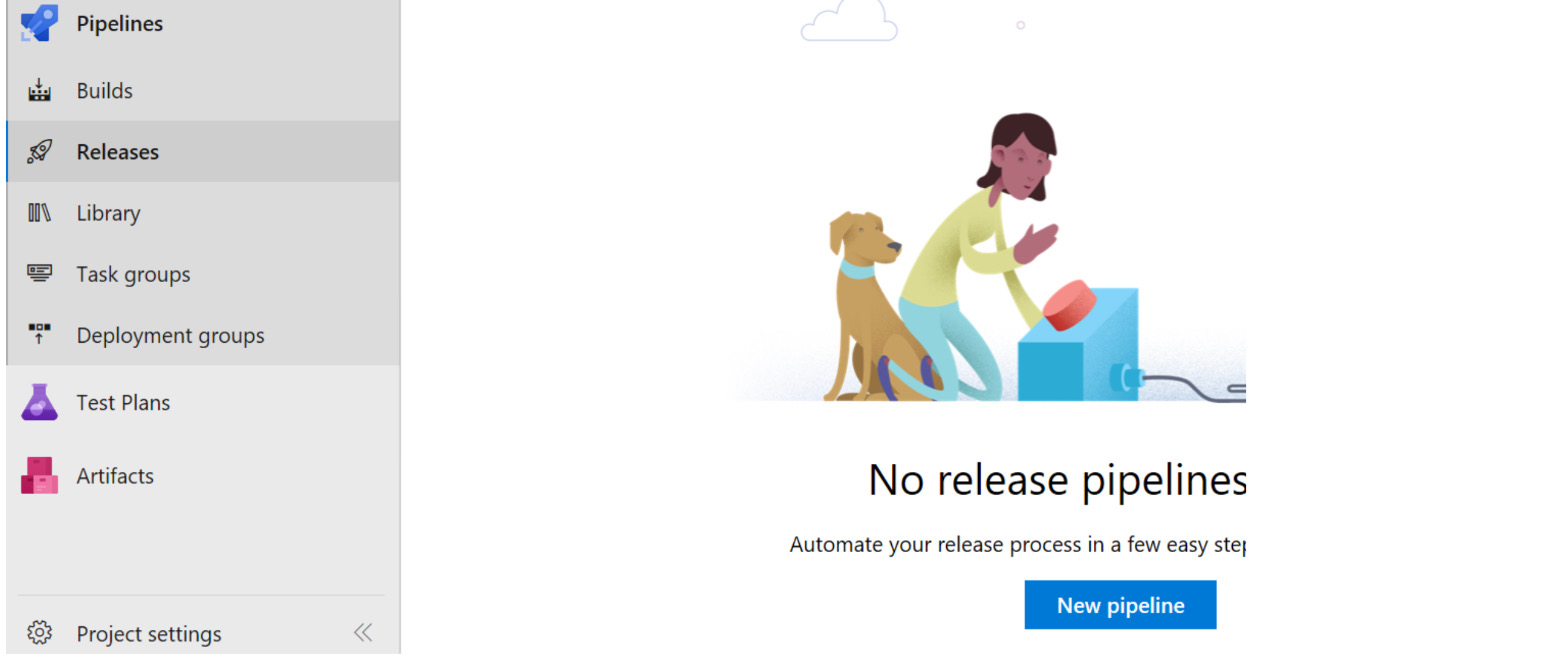
Well, we’re nearly there, and all without losing a horse in a swap. Sadly, Yaml Release pipelines are not available yet so we’re going to manually put this out. Here come tons of pictures:
Get yourself to Pipelines > Releases. Likely empty. Guess which button you press.
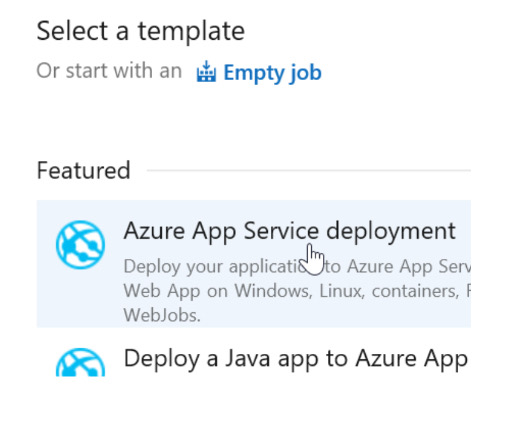
For your template, Azure App Service deployment (remember we made that all the way back in act 1 - a stranger calls) You’ll then get prompted to call your stage something. so like “Prod” or “Dev” or “UAT” or anything else like that
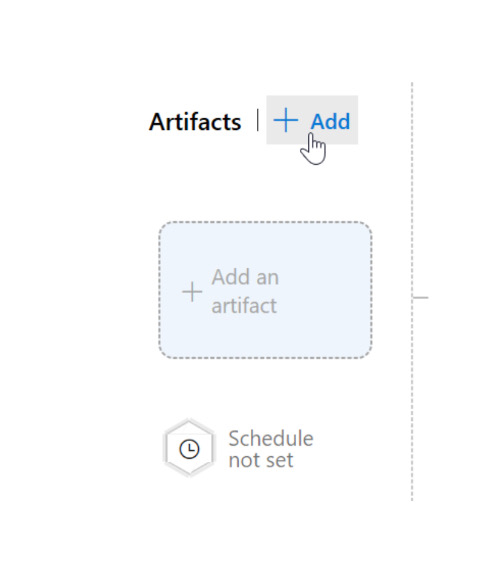
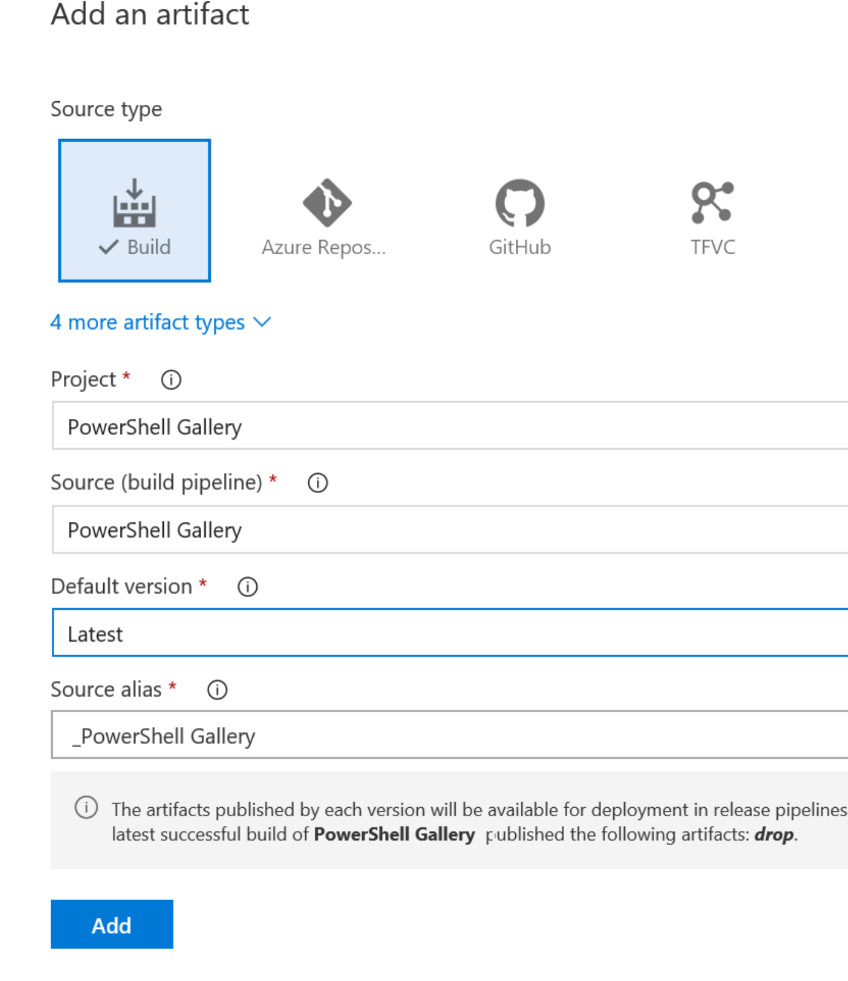
Add artifact (this is the .zip Drop you created as part of the build)
Build artifact (you created it as part of the build remember). Version just say latest. Copy the picture basically
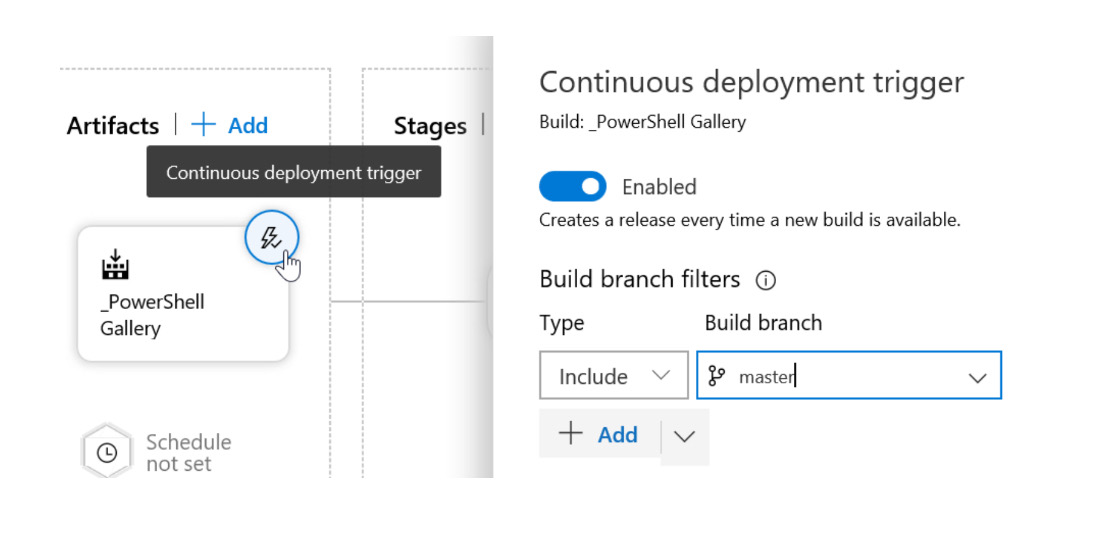
Enable Continuous Deployment filtered on master branch (you can mess with what branches you have later if you like)
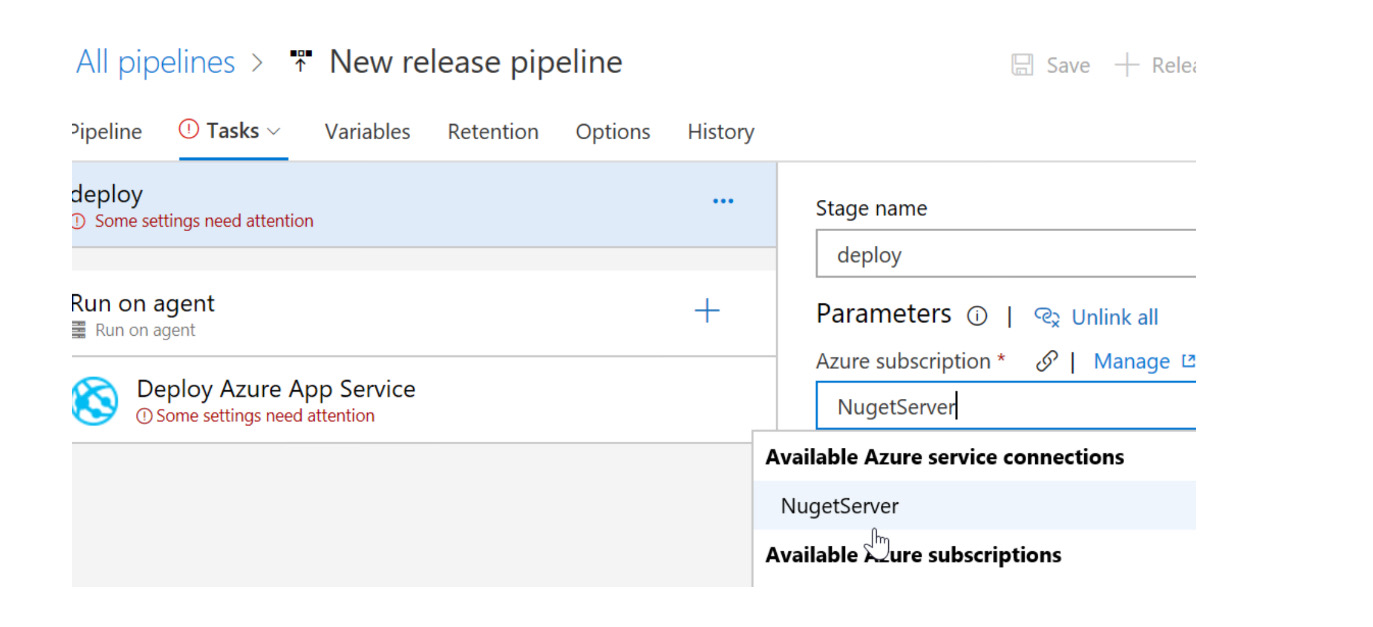
Now we click into the task to fill that template in (I called my stage “Deployment”)

Once you’re there we want to be following the next series of pics.
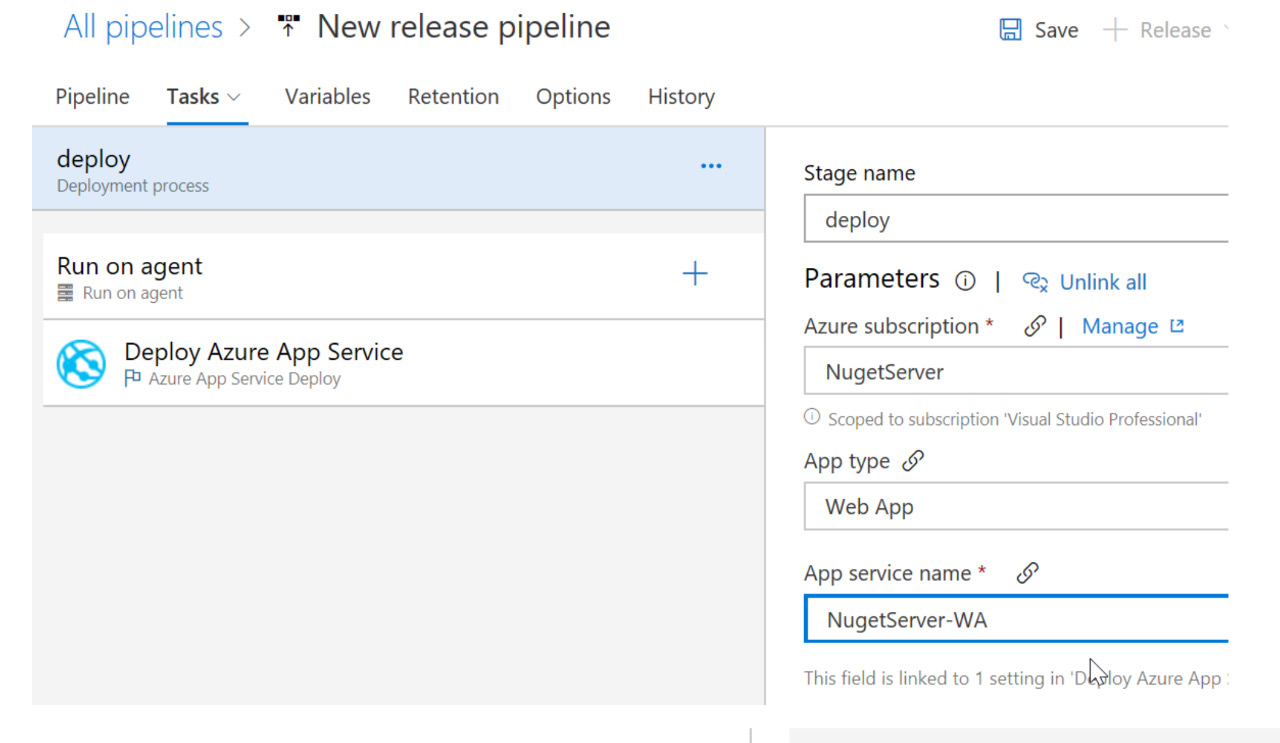
You use the service connection we created earlier
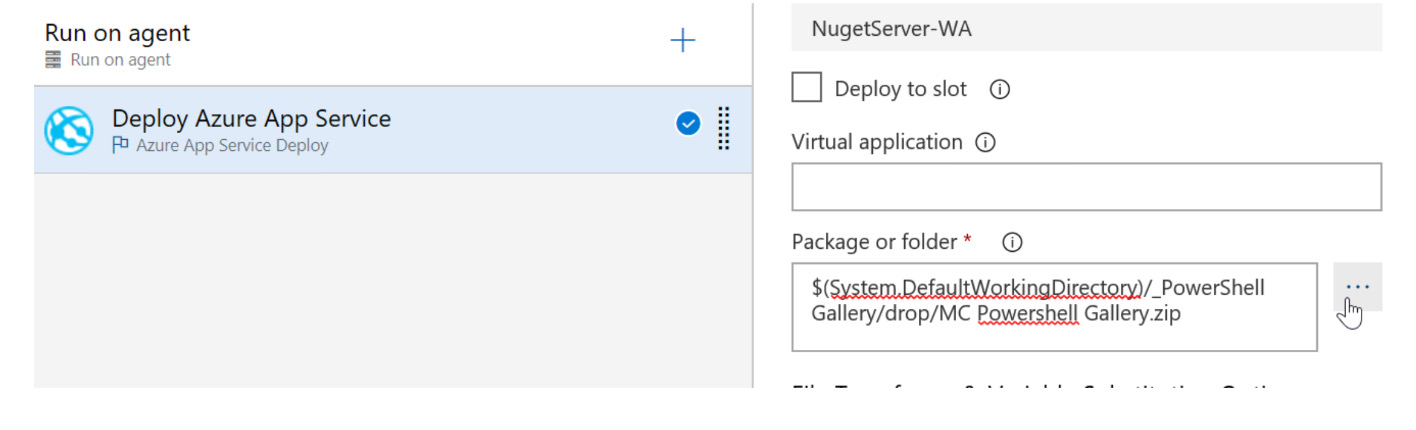
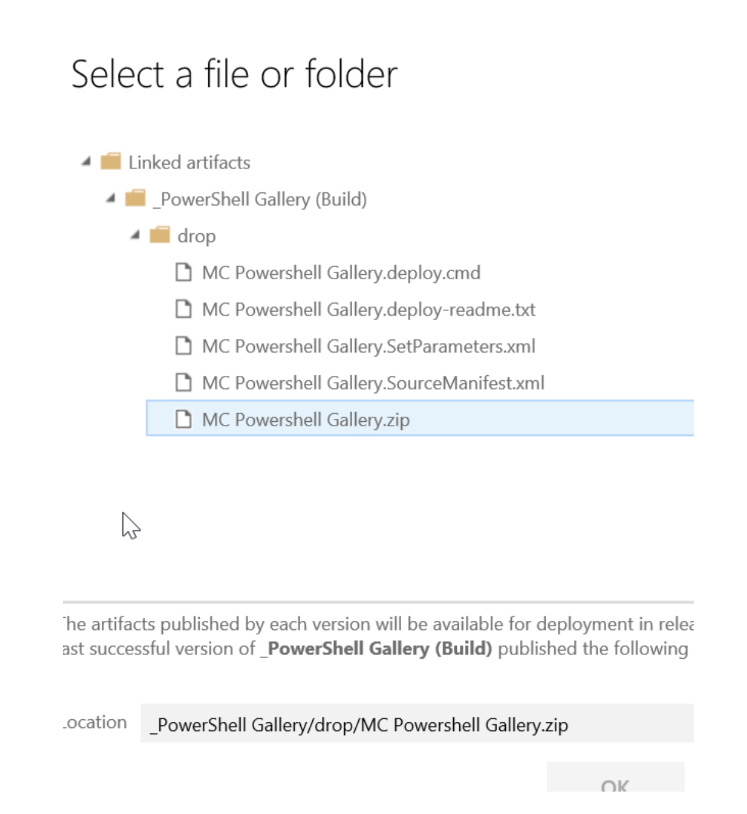
Under “deploy Azure App Service” for the “package or Folder” click on the … and then navigate to where your zip file dropped. If you don’t see it, then make sure your build completed. If the Build didn’t complete then you don’t have an artifact to point to.
That’s all the settings you need. Now start the release.
Once it completes, you should have a working Nuget Server with CI CD!
#AND THAT’S IT FOR THIS PART. The stage is set… a hush falls over the crowd as they drink their weak lemon drinks.
Part 2 follows v shortly.
Unnecessary buttons